Working with Eclipse
Developing with Eclipse
This page explains how to get quickly started if you want to use Eclipse to develop PostgreSQL.
Used software for this manual:
OS: Ubuntu 8.4
Editor: Eclipse Helios
Versioning: CVS
The manual has been tested on an Ubuntu Live Version to make sure that no required Software is already installed.
!!Important: An internet connection is required
(Remark: If you haven’t installed Ubuntu yet, we recommend the following Link: http://www.ubuntu.com/desktop/get-ubuntu/download )
Install version control software
The preferred way to get PostgreSQL source code is to use the git version control software. This tutorial will also cover using the older cvs program. You only need one program, git or cvs, not both.
Install git
Start Ubuntu Software Center:
Applications » Ubuntu Software Center
To install git you should go to the magnifier on the right top side of the application, and enter "git". From the results choose "fast, scalable, distributed revision control" and click on the Install button (if git is not already installed).
Install CVS
Start Ubuntu Software Center:
Applications » Ubuntu Software Center

To install CVS you should go to the magnifier on the right top side of the application, and enter "cvs". From the results choose "Concurrent Versions System" and click on the Install button (if CVS is not already installed).

Open terminal
Through Applications » Accessories » Terminal you can open a new terminal:

Install PostgreSQL source code =
Now you can download the latest version of the source code, so you can edit it locally in your computer. Again you need to follow one of the cvs or git instruction sets, but not both.
Download with git
In the previous terminal, if you haven’t closed it (otherwise repeat step 1. Open terminal, and don’t close it until the end of the installation), you can make a copy with the following commands:
    mkdir project
    cd project
    git clone git://git.postgresql.org/git/postgresql.git
    mv postgresql pgsql
You can find more detailed information about setting up your own repository at Working with git. The cloned directory here is renamed to "pgsql" to match the cvs examples below. You can leave it as postgresql instead, and just modify the rest of the examples below to use that name.
Download PostgreSQL source code - CVS
In our example the CVSROOT is pgrepo (you can choose also an other name), and is located under Home
The command mkdir creates a new folder (pgrepo) and makes a new environment variable that links to this folder:
      mkdir pgrepo
      export CVSROOT=$HOME/pgrepo
The next command downloads with rsync the source code. This can take several minutes:
rsync --progress -avzCH --delete anoncvs.postgresql.org::pgsql-cvs $CVSROOT

Copy with CVS
With CVS (Concurrent Version Control) you can make a versioned copy of the folder pgrepo.
Use CVS
In the previous terminal, if you haven’t closed it (otherwise repeat step 1. Open terminal, and don’t close it until the end of the installation), you can make a copy with the following commands:
    mkdir project
    cd project
    cvs co pgsql
Warning: Execute these commands one layer above pgrepo, for instance in Home in our example!

You can find more detailed information about setting up your own repository here Working with CVS.
Configure source code
Install components with Software-Center
You need the following Software, and you can download them through Software Center (Applications » Ubuntu Software Center):
libreadline5-dev (For ubuntu 14.04 software version is libreadline6-dev)

zlib1g-dev

bison (YACC)

flex

You simply have to type the names of the software in the search area, and install them. This is the list of the required Software:
1. libreadline5-dev, 2. zlib1g-dev, 3. bison (YACC), 4. flex
Configure in the terminal
Switch back to the terminal and execute the following commands:
    cd pgsql
    ./configure --prefix=$HOME/project --enable-depend --enable-cassert --enable-debug

Download Eclipse
Install JDK for Eclipse
To see the PostgreSQL source code in an organized manner we will install Eclipse on the computer.
(Remark: You can use any other development tool also, but this manual explains the usage with Eclipse).
First of all you need the "OpenJDK Java 6 Runtime" for Eclipse, which you can also download in the Software-Center.
Start Software Center Center (Applications » Ubuntu Software Center) or switch to the opened window and search for java. Choose "OpenJDK Java 6 Runtime” and click Install.

Download Eclipse
You can download Eclipse from the following link: http://www.eclipse.org/downloads/packages/eclipse-ide-cc-developers/heliosr
It’s important that you choose a Helios Version, which supports C/C++. Open the Folder in your file browser, where the tar file is. In this example: ubuntu » Downloads.

Extract and start
Right click on the Package and choose "Extract Here" from the menu.

Now enter the extracted Folder and double-click the file "eclipse".

Set up Workspace
You should set up a workspace, where the software stores your projects:
After starting the program you will be prompted to select a folder for your workspace. We will choose the recommended path, but you can change it if you browse for an other folder. If you have chosen your Folder click "OK".

The program
Now you see the welcome-page of Eclipse, where you can choose tutorials, if you are not familiar with Eclipse. To continue the manual choose the arrow on the right to open your Workbench (the defaults layout of the program).

We will import the PostgreSQL code in this workbench.

Import
In this step we will import the project. Select in the left top of the program "File » Import "

In the new window select "C/C++ » Existing Code as Makefile Project" and click the "next" button:

In the next window click browse, and choose the pgsql folder.
"Language" is "C" and "Toolchain for Indexer Settings" select "Linux GCC". At the end click finish.

"Make" will start automatically (this can take several minutes). If every components work well you should have the following message in you console:
"All of PostgreSQL successfully made, Ready to install"
Furthermore you can see the Project "pgsql" on the left side of your workbench in the project explorer view.

Adding make targets
Open the Make Target view
If this you can’t find this view, simply click on the Button in the left bottom to add the.


Add Target
In the Make-Target-view right click on the project name and select "New". In the new window "Create Make Target" type at "Target name:" "install” and click "OK".

If this was successful in the Make-Target-view at the end of the list a green dot appears with the label install. Double-click this, so you start the installation of PostgreSQL.

If the installation was successful in the console you can read:
“PostgreSQL installation complete".

Launch initdb in the terminal
Switch back to the terminal and change to the path "ubuntu/project/pgsql". Before starting initdb you should set some environment variables.
     export PATH=$HOME/project/bin:$PATH
     export PGDATA=DemoDir
     initdb

Run Configurations in Eclipse
Switch back to Eclipse.
Select the Project Explorer view. If you can’t see it, add it with the button in the left bottom.
In the Project Explorer view right click on the Projektname (pgsql), and select "Run As » Run Configurations".

In this Window you can add a configuration:

Double-click "C/C++ Application" so a subfolder is created with the name "pgsql-Default". Now fill in the form on the right side. At "C/C++ Application:" the path: "src/backend/postgres" and project should be: "pgsql".

Switch to the tab "Arguments". At "Program arguments" type the arguments "-D DemoDir" and click the "Apply" button. Click "Run" to start the program.

You should see following logs in your console:
LOG: database system was shut down at (current date and time) UTC
LOG: database system is ready to accept connections
LOG: autovacuum launcher started

That means, the installation was successful and the server is running!
Add include files
When looking at source code files, you will see compiler errors saying that include files were not found. To fix this, you need to add and include directory to properties. From the menus, choose Project/Properties/ C/C++ General / Paths and Symbols/Includes. Add an Include directory. Click on Workspace. Choose <project>/src/include and hit enter. Allow an index rebuild.
Debugging PostgreSQL from Eclipse
- Make sure gdb is installed on your machine
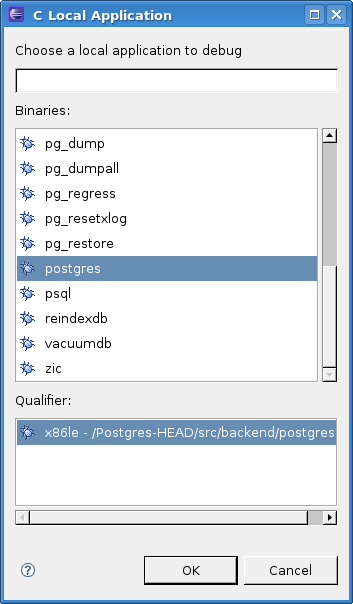
- Right click on the project in the Project Explorer window and select 'Debug As -> C/C++ Application'
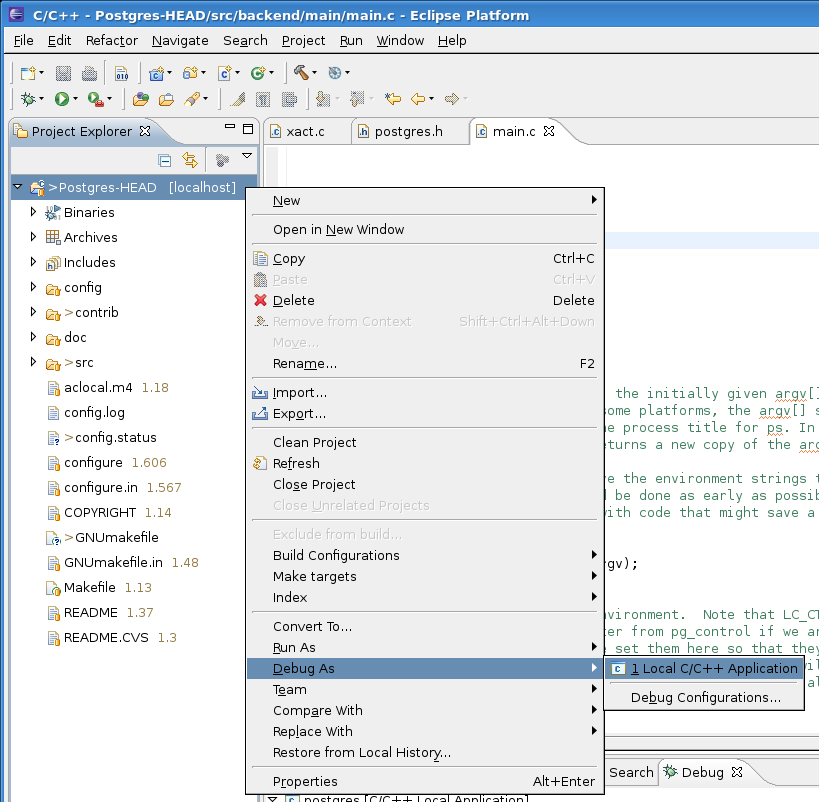
- Select 'postgres' as the binary to execute
- If you don't have PGDATA set in the environment Eclipse is running in, you can tune the command line arguments in Run/Debug Configurations so that Postgres can start properly
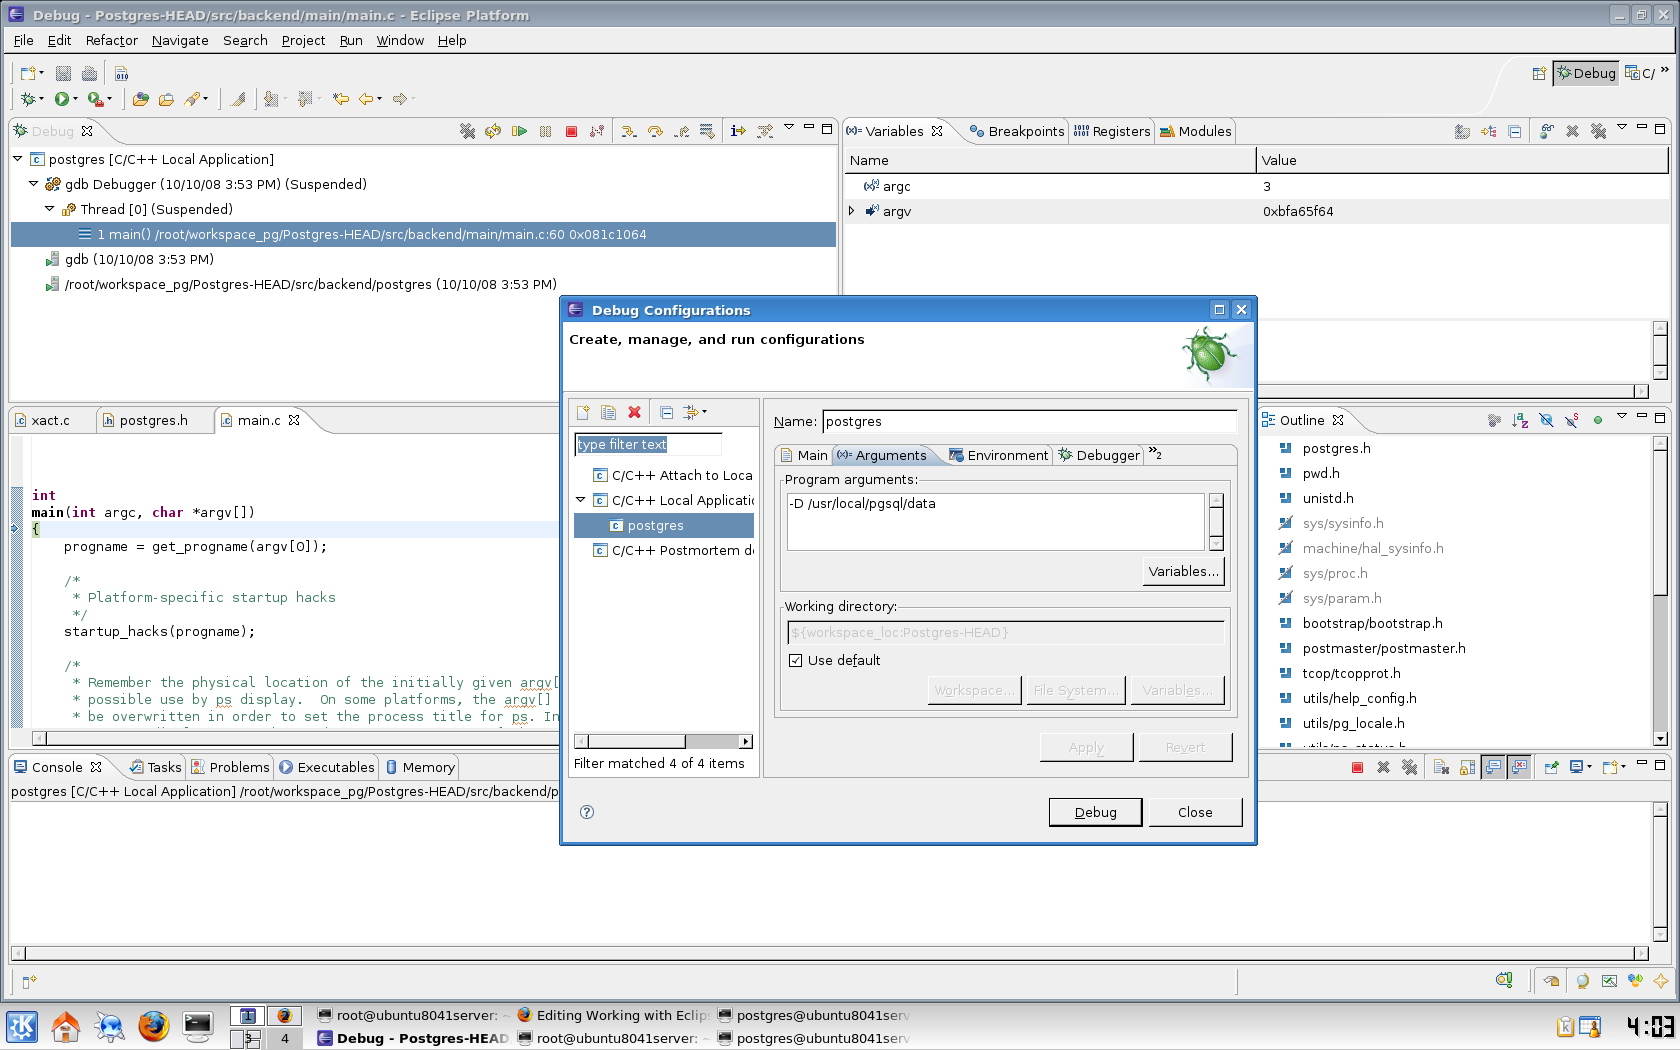


Tip: You can do a 'make install' and make your arguments points to that installed directory.
Debugging with child processes
When you start debugging process by using the project default, it can only debug the postmaster process. When clients connect to the database, the postmaster process forks child processes, each of which is actually postgres backend process responsible for the response to the client. You might want gdb to be able to access the forked processes too. Here's how to set that up:
- Debug Perspective => Run => Debug Configuration
- On left side of menu you can see "C/C++ Attach to Application"
- Right click on "C/C++ Attach to Application" and create new debug configuration,
- Set Project, Build Configuration as "Use Active" , C/C++ Application as "postgres" executable path,
- Start postmaster & one instance of postgresql client in the terminal(for creating one new postgres),
- Click on Debug which will show current process list,
- Select forked "postgres" process you want to debug
- Put breakpoint in your function,
Note: if attaching to a process fails while logged on as an ordinary user, it may be due to Maverick Meerkat (10.10) Ubuntu introducing a patch to disallow ptracing of non-child processes by non-root users - ie. only a process which is a parent of another process can ptrace it for normal users - whilst root can still ptrace every process. Hence why you can use gdb to attach via sudo still.
You can temporarily disable this restriction (and revert to the old behaviour allowing your user to ptrace (gdb) any of their other processes) by executing:
echo 0 | sudo tee /proc/sys/kernel/yama/ptrace_scope
To permanently allow it edit /etc/sysctl.d/10-ptrace.conf and change the line:
kernel.yama.ptrace_scope = 1
to
kernel.yama.ptrace_scope = 0
Create and open Database
To see, that the installation is completely working you can do the followings to test the database.
Switch to the terminal, and change to the path "ubuntu/project/pgsql". Execute the command:
psql -l
This will list you all available database.
To create your own database simply type the following:
createdb DemoDB
If you execute the list-database again (psql -l) you can see your database, "DemoDB":

You can login to your database with:
psql DemoDB

Now you can create tables, relationships and much more. You can fully access your database. To exit your database type:
/q
Terminate the program
The server is available until you click on the red rectangle in the console of Eclipse.
If the stop was successful you will see the following log in the console:
LOG: received smart shutdown request
